Social Icons

Pages

Showing posts with label WINDOWS 8. Show all posts

Saturday, 14 December 2013

How to Speed Up my Windows 8 PC to Work Faster - 10 Tips

Do you have Windows 8 installed and are thinking about tweaking its performance? Or have you installed many apps and softwares and now the question “Would this effect the performance and booting speed?” is clicking in your mind. Well today let’s see how to tweak the performance of Windows 8. We all know how certainly fast Windows 8 is compared to earlier version of Windows like 7 or Xp. The following tweaks or methods will certainly speedup your windows 8 performance even faster.

Changing Power Settings :

This is the most easy Tweak. Just open the Charging Power Settings by accessing the Control Panel and set the option to “Set to High Performance”.

Closing Unnecessary Programs at Windows Startup:

Now, whenever your computer boots it analyses and reads Startup Programs on Startup. Some Programs get enabled at Startup by default on installing them. Such type of Programs increase the time your computer takes while booting. Take the following steps to disable them on Startup.
  • Press Win + R
  • Type in ‘msconfig’ and press Enter
  • Choose Startup tab
  • Uncheck programs that are unnecessary for loading at Startup
  • Click on Apply and Ok
  • It will prompt you to restart
  • Changes will take place once you will restart
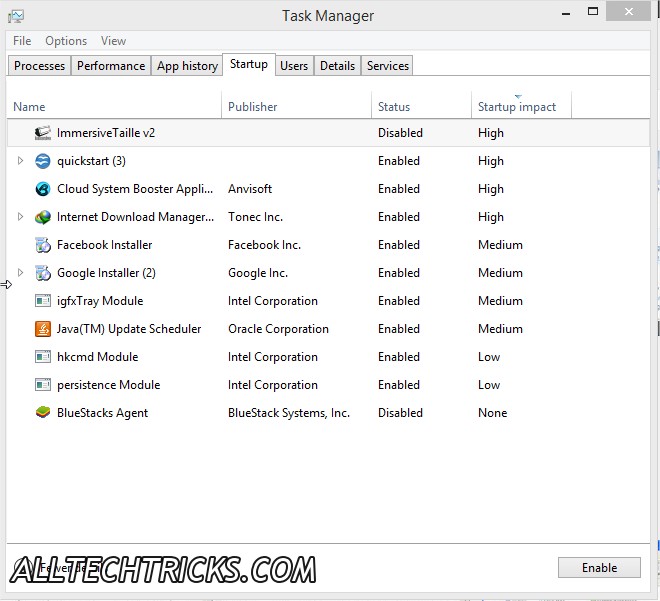
Note: In previous Windows versions the startup items list was present in system configuration manager which can be accessed using msconfig command. But Microsoft has moved the startup items list in Windows 8. Now it can be accessed using Task Manager.
  • You can open Task Manager by pressing "Ctrl+Shift+Esc" keys together. Now go to "Startup" tab and here you can click on the unwanted item and click on "Disable" button to remove it from startup list.
  • You can start these programs again by manually selecting them.

Registry Cleaner:

Throughout your life you install so many Programs and then Uninstall them. But these programs leave behind the registry keys like the breadcrumbs for Windows. The Windows reads or goes through these registry keys every time. So you therefore, need to cleanup these registries using a registry cleaner. It will not consume much of your time. Here is the Registry-script which will tweak some settings in Windows 8 Registry to make Windows faster. It will reduce timeout values, set Windows to automatically end not responding tasks, make menus to show faster upon clicking and tweak various other settings.
Windows Registry Editor Version 5.00

[HKEY_CURRENT_USERControl PanelDesktop]
"AutoEndTasks"="1"
"HungAppTimeout"="1000"
"MenuShowDelay"="8"
"WaitToKillAppTimeout"="2000"
"LowLevelHooksTimeout"="1000"

[HKEY_CURRENT_USERControl PanelMouse]
"MouseHoverTime"="8"

[HKEY_LOCAL_MACHINESYSTEMCurrentControlSetControl]
"WaitToKillServiceTimeout"="2000"
Just copy and paste this in Notepad and save this as registryspeed.reg. Then Open this file and Click yes when UAC dialog opens. After that again click yes to install these settings.
Effects of this Tweak:
  • End the tasks of the Applications or Apps which are not responding and taking much time to close by Windows Automatically
  • Decrease menus show delay time. After that When you click the menu, it will open faster.

Disable Animations and Increase Performance:

Windows 8 comes with lots of candy features. It will show animation effects even while minimizing and maximizing a window or closing programs. These candy features might amaze you but they  You can disable these animation effects for tweaking your Windows 8.
  • Press Win + R
  • Type ‘Command’ and press Enter
  • Now type SystemPropertiesAdvanced and press Enter
  • You can view System properties with Advanced tab
  • Now click setting button in Performance section
  • Now you can see a performance Option Window
  •  You can uncheck boxes on animations that you don’t want to see or you can use ‘Adjust for best performance’
  • Click Ok
Note: Here is the list of animations which you need to disable.
  • Animate controls and elements inside windows
  • Animate windows when minimizing and maximizing
  • Animations in the taskbar
  • Fade or slide menus into view
  • Fade or slide Tool Tips into view
  • Fade out menu items after clicking
  • Save task bar thumbnail previews
  • Show shadows under mouse pointer
  • Show shadows under windows
  • Show translucent selection rectangle
  • Slide open combo boxes
  • Smooth-scroll list boxes

A Few More Things to Do to Make Windows 8 Faster:

After following all above mentioned tweaks, you should be able to notice sufficient improvement in your system’s performance. Even though, apart from these steps, you should also do following things regularly:
If you have any other tips and tweaks to increase the speed of the Windows 8, do share with us  in comments

Monday, 25 November 2013

How to Create Windows 8 USB Recovery Drive

If you don't want to mess with your computer creating a windows recovery Drive and Disc is the first important thing that you must do as soon as you complete windows installation . Recovery discs and drives can help you to fix all the problems caused on your windows computer by bad-files,problems cased in windows due to hardware failures,and can even help you when the system doesn't start-up normally. Here in this post we are covering on creating USB recovery drive.

Before you get ready to create USB Recovery Drive:

Here are few things that you should check before creating the USB recovery drive for your windows 8 computer.
  • You should check if there is already Recovery partition present on your computer, Because to create a USB recovery drive there should be a recovery image present on your computer.So to check for the recovery image on your computer.
  • Open Command Prompt with Administrator rights.(Search for Command in start menu, Right click on command prompt and hit on "Run as Administrator")
Enter the password if you are asked to continue.
Now enter this command on your command prompt recimg /showcurrent and hit enter.As shown in below screen shot.
If you got the error the messaging saying that "There is no active custom recovery image" as shown in below screenshot then you must create a recovery image on your computer. If there is already a recovery partition then you  can directly head to create to usb recovery drive.
As there is no recovery image on your computer present, we should create one. We can create new recovery image by entering these two commands one by one
  • mkdir C:\RefreshImage  and hit enter
  • recimg -CreateImage C:\RefreshImage  and hit enter
After entering these two commends you will be able to see the process of creating recovery image on your computer as shown in screenshot below.You can delete the recovery image from your computer to save the memory after completing of creating the USB Recovery drive.
After completion of creating the recovery image we can now jump to create the USB recovery drive!

Creating Windows 8 USB Recovery Drive

To create a recovery drive search for the "recovery drive' in windows search. and click on Create a recovery Drive. (Note you must have administrator rights, it might ask you password.)
  • When the tool is opened check the box to Copy the recovery partition from the PC to the recovery drive. And hit Next
  • Now Insert the USB drive into USB port, make sure that there is no information stored on your USB, as the recovery tool will completely wipe out the data stored on USB. 
  • And then select the usb from the list of available USB drives for storing the recovery image.And Hit next.And then Hit on Create.
  • That's it! You have created Windows 8 Recovery image.You can now use that to refresh and reset your windows 8 computer.
  • If you want to store the recovery image on your computer then you can hit on "Finish" or if you want to save the space you can delete the recovery image by hitting on "Delete".
  • After everything is done you can remove the USB from your computer.

Wednesday, 16 October 2013

How to Dual Boot Windows 7/8 and Ubuntu

Most of the users only use Windowsor Mac OS or a Linux based operating system . If a user wants to use both Windows and Linux OS in their PC or Laptop . Then this tutorial helps you a lot Ubuntu is a Linux based operating system with good interface and suggested for beginners . In this tutorial I will be discussing about how to dual boot both Windows and Ubuntu in your computer.

Steps to dual boot Windows and Ubuntu:

Follow the below steps to dual boot with Windows and Ubuntu .Ubuntu provides a Wubi which is a windows installer for Ubuntu desktop . 
  • First visit Ubuntu website to download wubi here. 
  • Click on Get the installer as shown below.
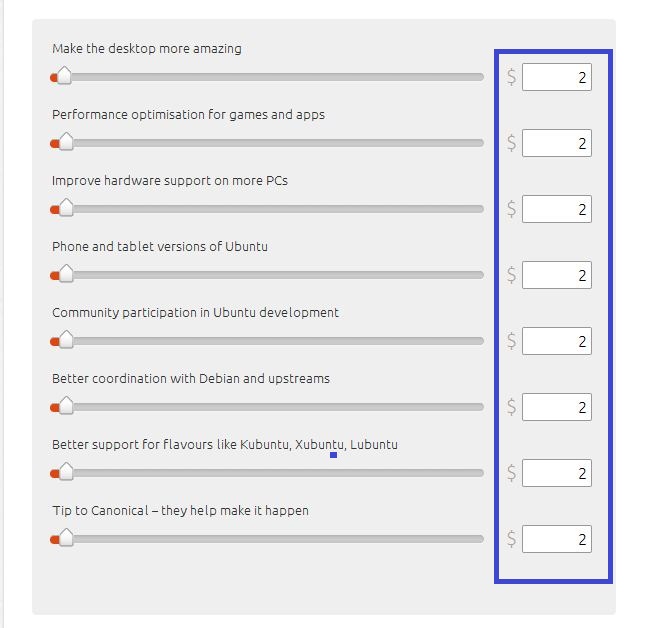
  • Now it shows you to pay $2 for each column as shown below .
  • Change this to $ 0 by just sliding the bar to left and finally it appears as shown below . Now click Download and file will be downloaded fast as its size is 2.4 MB.
  • After downloading the file , double click on wubi.exe and a pop-up arises asking for permission click Yes.
  • Next a Ubuntu installer appears and   now select the drive to install it , select installation size by default it gives 18GB , select environment as Ubuntu and finally set your username and password to login as in windows . If you feel any difficult then it appears as shown below . 
  • Then click Install and it takes about 15-20 min to install the Ubuntu OS into your Computer .
  • Once it gets installed Select on Reboot now and click finish (Now it gets restarted ).
  • After restarting the PC or Laptop you will find screen like this.
  • Select Ubuntu by using down or up arrow in your keyboard and click Enter .
  • Then the following screen appears , select Ubuntu ,Linux -generic 1st option from the 3 options using arrows from your keyboard.
  • Again it installs the main components required and packages. This might take a few minutes .
  • Next you will notice a Login screen asking user name and password , Type the username and password which you have selected above .
  • Then click login and you will get a good interfaced Ubuntu Desktop.
Also Check: Update Drivers in Windows 7 and Windows 8

if you have any questions or any problem while following any of above steps let us know in the comments below we will help you

About Author:

Lalith is an 2nd year engineering student.He is interested in writing about technology,computers,blogging,you can follow him on facebook

How to Fix Blue Screen Error of Death In Windows 8 and Windows 7

Blue Screen Error is one of the common problem that every windows 8 user is facing.Blue Screen Error is also know as Blue Screen of Death (BSOD) there are many reasons for occurrence of this problem on your windows 8 computer. A Blue Screen of Death is usually hardware or driver related
Check: Download Antivirus for Windows 8


Here are some common reasons for this error:

Sometimes Restarting your System can help you to come out of this problem :) (If you luck enough!)

Problems in Registries:-

Registries are considered to be the most important part of your computer, these are used to store the settings of your PC to run smoothly. Problem in these registries can make your computer to crash!.

Solution to this Problem:Clean the registry

You can use some registries cleaners to overcome this problem.There are so many software available on Internet which can solve this problems.We recommend to use ccleaner.

Malfunctioning Programs /software

There are some software which can crash your computer, so it is so important to ensure that your computer supports the software to run smoothly.
And running of programs infected with Virus and malware, can also lead to registers problems, finally to the Blue Screen Error.

Solution to Above Problem:-

Right now there is no software or tool which can help you in checking the compatibility issues, before installing, some times windows detects them automatically and reports to you,  So you need to get the ensure from the manufacture of the software that it supports your windows operating system.

Improper Shutting Down

I have seen some people and I myself shut down the computer improperly! which is really a bad habit, which can decrease the health of your computer and make your problems more severe!
So stop shutting downing the system directly. Use proper ways to shut down for your

Clean Up the Start Up programs:

The malfunctioning programs can avoid you to login into your system and can cause the BlueScreen error, Usually these programs start running at the Startup time and will cause the errors.

You can kill all the startup programs by following these steps:
  • Boot into Safe Mode into your computer
  • Then open the "Task Manager"
  • and open the tab "StartUp"
  • Now disable the culprit program which is causing the error.
  • If you are not sure which one is causing error, you can disable all the programs!
  • And restart your computer normally!

Friday, 4 October 2013

How to Create Wifi Hotspot in Windows 7 and Windows 8 -Best ways

If you are one who looking to convert your PC as Wifi Hotspot then you are done.Here in this article We listed best 2 ways to convert your laptop as Wifi router.Once you turn you PC as WiFi router you can connect devices such as Android, another laptops etc.


Advantages of converting your laptop to a wifi router.

  • You can Enjoy internet in your wifi devices, any where you want but depend on your laptop wireless range.
  • Get rid of sitting at one place with wired internet connection.
  • If you have smart phone then you can get access to internet on your mobile.
There are numerous of method to turn your laptop a wifi spot (Windows 7 and 8 only),
Such as By command promote (only in windows 8) and by installing 3rd party software compatible with both.
Must Check: Talk to your Computer

First Method-

You need to follow below steps care fully in order to make your laptop wifi router successfully.
Step.1: Open run (windows key+R), type ncpa.npl.

Step.2: A new window is in front of you. There select wireless Network adapter and sharing center and select properties.
Step.3: In wifi properties Select share, followed by Allow Others Network users to connect.
Note- Never Tick 2nd Option.
Step.4: Now Open Command Promote As administrative.
Step.5: Don't worry by looking in below Command promote codes in picture, those are very simple.
             You need to copy and paste below command in command promote.
"netsh wlan set hostednetwork mode=allow ssid=”techbymak” key=”techbymak”"

You will see SSid which is actually your network name, which we are going to create.
Step.6:Now you need to start the network By using below command.
"netsh wlan start hostednetwork"
Every thing is done. Now you can observe your laptop is working like a router.
Note:To check How many Devices Are connected to your router you need to enter below command in command promote.
"netsh wlan show hostednetwork"
This was the first method to make your laptop a router.

Second Method:

We are using a Software in this method to make laptop Wifi router, this method is compatible with both windows 7 and 8.The name of the software is Virtual Router.Download the software and install it.( once you downloaded it will come in zip format so extract it)

When you have done all these make sure are connected to the network you want to share and then launch VirtualRouterPlus.exe.
Remember - Run the .Exe as administrative.

Let's Create A Network.

  • In this method we are using Virtual router so it is essential to create a new network.
  • It is similar to 1st method, here SSid also means the name of the network which we are creating, you can enter what you want.
  • If you want you can enter Password, it is important to prevent others to use your internet service. 
  • Now here you need to indicate which network is to be shared and then click on start Virtual Router.
I hope you guys like the article and feel useful for you .If you have any problem in above steps feel free to comment below we ill help you out.
Also Check: Turn Android as Wifi Hotspot

Wednesday, 25 September 2013

How to Update Hardware Drivers in Windows 7 and Windows 8

Want to Update all your Hardware Drivers on a Single click ? Here is a Free Solution from Slimware utilities.

SLIMDRIVER , apart from windows OS updates ,hardware driver updates are also important for the smooth functioning of PC,we often think that our hardware drivers such as display,Audio&sound,Network,Motherboard,Usb are up to date but it is not the case for most of the windows users.

Well there are many other software available on net to update your hardware drivers among all of them SlimDrivers is the best,free & user friendly . It is compatible with windows xp,7,8 vista. it is just a simple 3 step process.

Step by Step process:

Step: 1

Download and install the software from cnet.com here is the download link

Step: 2

Now open the Slimdriver from windows start button and click on START SCAN the software will check the hardware components and it will search for the latest hardware drivers from the manufactures website 
step 2

Step: 3

Now the SlimDriver will list the all available hardware updates according to the hardware category now click on  download update corresponding to each driver update the Slimdriver will automatically download the update from the official site 
it is preferred to create a restore point( a dialogue box will appear) and then reboot your system after installing hardware update.


SlimDriver will be a very hand tool for those who use laptops ,where  there is  need to update WiFi,Bluetooth , Graphic , USB , webcams  drivers it is the leading software tool under update category in CNET , Brothersoft , Softonic and many other sites .It is a free tool so our recommendation is to give it a try and see the result.

Also Check: How to Improve System performance

If you any doubts/problems while updating drivers comment below we will help you out and dot forget to share this article with your friends.

Saturday, 31 August 2013

Top 5 free Best Antivirus for Windows 8 PC (Download)

As you all know that Microsoft Officially launched its new operating system Windows 8. Many people are starting using windows 8 and most of them looking for the best antivirus for it.so here we listed the 5 best free antivirus for windows 8 to download.

1.Bitdefender Antivirus Plus 2013:

Bitdefender has always been the best antivirus when it comes to protection of Windows from viruses, spyware, malware etc. by using this you can cure the infected files rather than deleting them.
some features:
  • Facebook and Twitter privacy protection
  • Secure online transactions
  • Detects harmful websites
  • ID theft protector and many more

2.Microsoft Security Essentials:


This is one of best anti virus.i personally use this, it is absolutely free.it has clear interface nad user friendly 
some features:
  • Malware detection
  • scan speed
  • rootkit removal and many more.
          Check: How to Use Whatsapp on Pc

3.AVG Free 2013:


AVG Anti-Virus is another best Anti-virus software that is available for free. It is a Great antivirus which has been made in an easy to use manner for every pc and laptop user who wants to keep their computer secure in all the necessary way. It detects all the threats, viruses and malwares from affecting your PC. 

4.Avast Antivirus 2013:

Avast is one of best Antivirus for PC as well as Mobiles.it is user friendly and it gives compelte protection from malwares.trojans and virus.

some features:
  • Secure shopping and banking
  • runs risky programs safely
  • Blocks Hacker attacks
  • Blocks phishing scams and many more.

5.Kaspersky Antivirus:


Kaspersky Antivirus is the best antivirus software defending your PC against viruses, spyware, Trojans, and other online threats.By using this you can get time to time updates.So that you can protect yourself form Malicious attacks.


Friday, 9 August 2013

Top 10 Most Useful Windows 8 Apps

Windows 8 Operating system with a fully different UI and features From the Old versions of Windows.As the Windows 8 was Launched peoples reaction wasn't good for it because people aren't aware of its cool apps offered in its Appstore.So here we discuss about 10 must have Windows apps Which changes your Full view against the Windows 8.


Must Check: Android Like Pattern Lock For Windows 8

1.Free Books:


This is App is same as its name allows you download Free Books. Free Books App Provide you access to 23,469 Classic Books which you can download anytime and can read it on any device from Laptop to Kindle readers.This App Provides you easy and efficient search option to find you books without any waiting.This app has many options including Editor's Choice and Featured Books.This is app is a must who loves to read a lot like me.

2.HowStuffWorks


I think almost majority of peoples would know about How Stuff Works website. But for the Peoples who don't know i am telling once again.These a quality website which provide excellent article and videos about How Stuff Works and they provide this articles and videos about all most everything. So this was about the Website, now we look what this app.This app has pretty much simple work but very useful.This App Provides all the articles and videos of the web site as a package on the app through which you can access the videos and articles from the app itself.Or in Simple Terms you can say that this app converts the website information into a Bundled app.

3.Toolbox for Windows 8


This App Provides you some good tools for your Desktop which are really impressive.The Tools which are provided by Toolbox app are small but very efficient and useful.And the most important feature of this App is that You can run 6 tools on one screen only.Which Provides you to Surf Web through Toolbox Browser at the same time Doing Some Mathematical Calculation through the same toolbox tool.Like this youcan run 6 different Simultaneous at one screen.Currently there are 12 tools provide by this Toolbox app Including Facebook, Voice Notes,Doodles and many more.

4.WordPress


One of the Best and Famous Blogging Platforms has showed his Presence on Windows store.By Launching it Small but useful App for Windows 8 users.This App has a pretty simple Design.This App read and share the Contents off their blogs.They allow you read the blogs you follow and share the contents easily all you of do is just sign in through your WordPress account on this app.This is a must have App for Bloggers.

5.Facebook Messenger

Facebook the World famous Social Networking site in the world is also here in the windows app store by launching its Famous Facebook messenger in Windows store.This is app is similar to mobile Facebook messenger which allows you to chat with your friends on Facebook when you aren't logged in you account also.This is app doesn't need much introduction.

6.Google Search


I will be a fool if i explain about the Google Search.Google Search App Provides you a faster way to search about your Queries on Google.Google search app is Loaded with many features like Voice search which allows you to search from your voice, Image Search allows you to search images,Google Instant which helps you a lot in instant search in which you don't need to hit enter key also just type Google will find your result and loaded with many other features.

7.Pinball FX 2


This a Gaming app Based on the Windows game Pinball but with much cool interface.This app has been upgraded with much more impressive Graphics and loaded with more pinball tables which makes the game very interesting.

8. Skype Voice Changer


This is a pretty much fun app like its name only this app helps you to change your voice on Skype Calls.This is app provides list of various voices to change it with your voice on skype calls.From this app you can play funny pranks with your Friends.This app is Must for all Skype users.

9.Multimedia 8


This app is for all the windows users who love Windows media Center which is missing in Windows 8.But not to worry Multimedia 8 app allow you to browse and access to music and video files.This is app has many other features like 3D video support, Video Converting, Video and audio capture and many more awesome features.

10.Metro Commander


Metro Commander app is File Manager which helps you to manage your Files with a Pretty awesome Windows UI interface.It have all the features which a File Manager should have other than that additionallyyou can manage file on the web with your Skydrive account.
Must Check: Top 10 Most Useful Softwares for PC

Article written by Shubam Khatwani

Thursday, 8 August 2013

How to Add Pattern Lock for Windows 7 and Windows 8

Are you bored with your default password system on your windows computer then this post is absolutely from you. You can enable the Pattern Locking system which is usually found on smartphones to unlock, on your windows 7 and windows 8 PC.You need not to worry about the security of your system with these pattern locking systems.


Also Check: How to Add Pattern Lock For Iphone

Here we have tested two pattern locking tools on our computers and felt wonderful with the tools.

1.XUS Pattern Locking Software:

This a best tool for locking your windows 7 and windows 8 pc with the pattern locking system.This tool has many features like:
XUS-Pattern-Lock
  • You set a Alarm when there are incorrect login attempts on your computer.
  • You can select the no of points for locking your windows.
  • You can set a transparent windows or a default windows.
  • You can enable or disable the Pattern locking on the windows startup.
  • You can Turn off the Internet when locked.
  • You can backup the Pattern Lock to your local drive in the form of image file.
  • You can set a costume message on the lock screen.
  • You are advised not to forget your pattern lock. It is good and best option to add the password too to unlock the system.
  • This tool available for free trail from here.
Each license costs 20$. 
This tool is compatible with Windows XP,Windows 7 and Windows 8

Must Check: Best Antivirus for Windows 7 and Windows 8

2.Eusing Maze Lock:

This tool too has all the features of the XUS Pattern locking system. This tool is available  for free. You can this tool from here this is the best alternative to the xus pc locking system.
This tool is compatible with Windows XP,Windows 7 and Windows 8.
  • You can find many other features like setting time for automatic lock and some cool features.

3.Using Windows 8 Inbuilt Picture Password:

Windows8-Piccture-password
Windows the powerful operating system form Microsoft had many best hidden features one of them is Picture password. Unlike the pattern locking system on smart phones, picture password asks for the specific area to be selected as password or pattern on the picture to unlock the system.
If you want to try the Windows 8 Picture password just enter the Picture password in the start menu, and hit on the "Change or create a picture password" then you will be able to create you own pic password on your own picture.

Windows8-Piccture-password

Must Check: 10 Tips to make Windows 7 fast